


If nothing else, Plunder Peril served as a great learning experience for myself in terms of understanding how to prepare for and launch a game on Google Play.
When finalizing the game, I finally reached that point where it was time to begin implementing an API for leaderboards, ads, and analytics-tracking. I knew about Google Services for Android and intended on utilizing them from the beginning. However, when it came time to actually get the API implemented, things began to get a bit confusing (it wasn’t just as simple as plugging in an ID number into your Flash game provided by the Mochi Media dashboard, that’s for sure).
So that’s why I’m writing this guide. I know when I was putting all of this stuff together for the first time I had two incredibly helpful guides I referred to:
- http://upandcrawling.wordpress.com/2013/08/16/libgdx-and-google-play-game-service-integration/
- http://helios.hud.ac.uk/u1070589/blog/?p=202
I figured I’d write my own tutorial as well to give a third perspective. So let’s get started.
EDIT: Sorry about the lack of tab spacing in the code, WordPress is absolutley the worst to work with when it comes to posting code, their WYSIWYG editor loves to change things up on you but it’s too useful to just disable completely. The code will still work, of course, you just have to tab it yourself, sorry!
Step 1 – Download the things
You need two specific things from Google to get started.
- Google Play Services SDK – Download through Eclipse ADT, follow these instructions.
- BaseGameUtils – Download from the list found here.
Step 2 – Set up the things in your workspace
Now you need to actually import these projects and put them on your build path. Here’s how to do that.
(Ignore any errors that pop up while importing, they will hopefully be sorted out soon enough.)
For Google Play Services SDK:
- First, import the Google Play Services SDK. With Eclipse open to your current workspace, go to File > Import > Android > Existing Android Code Into Workspace.
- Browse to where the Google Play Services SDK is saved (when downloaded through Eclipse ADT, it is location at [Android SDK Location]\sdk\extras\google\google_play_services and select it. Before importing, be sure to check Copy projects into workspace.

For BaseGameUtils:
- Again, first step is to import the project. With Eclipse open to your current workspace, go to File > Import > Android > Existing Android Code Into Workspace.
- Browse to where the BaseGameUtils project is saved and select it. Before importing, be sure to check Copy projects into workspace.
- After it is imported, right-click BaseGameUtils in the Package Explorer window and select Properties > Jave Build Path > Projects > Add and select google-play-services_lib. This should resolve the errors produced by BaseGameUtils, if not, cleaning the project may help in Project > Clean.
- Right-click BaseGameUtils in the Package Explorer window again and select Properties > Android. Here, make sure the isLibrary checkbox is checked.

Step 3 – Link the things to your Android project
Okay, now we have the two projects imported and set up in our workspace. Time to actually intertwine them into our game.
Now, this tutorial is focused on setting up Google Services for LibGDX projects, so the steps from here on out may require tweaking if you’re not using LibGDX.
- Right-click your Android project and select Properties > Android. Click Add and add both projects (google-play-services_lib and BaseGameUtils).
- Now, still in the Properties menu, go to Java Build Path > Order and Export. From here, make sure the checkboxes next to Android X.X.X and Android Private Libraries is checked.
Step 4 – Modifying the Android Manifest
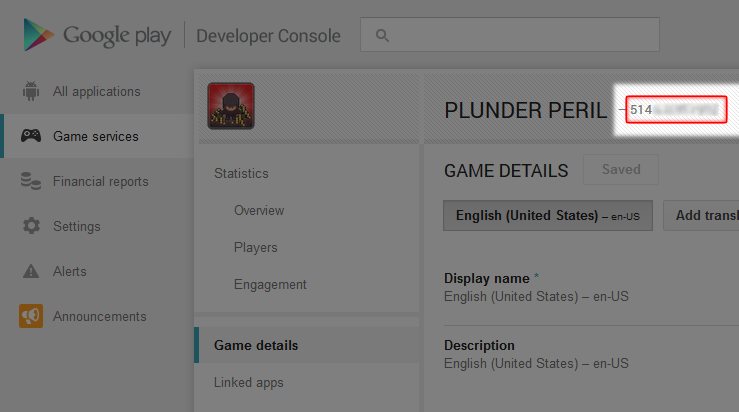
Now, before you continue any further, you should have a project for your game set up on your Google Play Developer Console. I’m not going to go in depth into that process, but it’s pretty straightforward. You need to go into the Game Services tab on the left, click on Add Game, fill out the information, and you’re done. What you need is your app ID, which is specified next to the title of your game.
- First, we’re going to create a new XML file to hold our IDs. In the Package Explorer window, go to your Android project > res folder > values folder. Right click the folder and select New > Other > Android > Android XML File. Call it ids.xml and save it.
- Grab the app ID of your game from your Google Play Developer Console and put the following inside of ids.xml (fill in your own app ID):
[cc lang=”xml” escaped=”true”]<?xml version=”1.0″ encoding=”utf-8″?>
<resources>
<string name=”app_id”>YOUR APP ID HERE</string>
</resources>[/cc]
Once you have this XML file created, we need to modify the Android Manifest file.
- Open the Android Manifest and add the following anywhere inside of the <application> tag:
[cc lang=”xml” escaped=”true”]<meta-data android:name=”com.google.android.gms.games.APP_ID” android:value=”@string/app_id” />
<meta-data android:name=”com.google.android.gms.version” android:value=”@integer/google_play_services_version” />[/cc]
Alright! At this point, the Google Services SDK should be embedded into your game and will be able to “talk” to the Google Servers. Next up, let’s actually make it do something.
Step 5 – Create the basic foundation
Alright, now we’re going to work with Java.
One thing I didn’t understand right away (since this was my first working with anything like this), was how you were going to be able to call Google Services API functions (built into the Android-side of things) from the source files of the game. The answer was simple, an interface!
- In your source game files, create a new Java interface and call it IGoogleServices.
- Inside of this file, place the following code:
[cc lang=”java” escaped=”true”]public interface IGoogleServices
{
public void signIn();
public void signOut();
public void rateGame();
public void submitScore(long score);
public void showScores();
public boolean isSignedIn();
}[/cc]
I’m sure you can tell what we’re planning to implement just due to the names of the functions. Once you are set up, you will be free to add/remove functions from this interface as you see fit, I just felt like these are a good starting point.
Anyway, since we have an interface, now we need some things to implement it.
- In your source game files, create a Java class and call it DesktopGoogleServices and have it implement the interface we just created, IGoogleServices.
- Inside of this file, place the following code:
[cc lang=”java” escaped=”true”]public class DesktopGoogleServices implements IGoogleServices
{
@Override
public void signIn()
{
System.out.println(“DesktopGoogleServies: signIn()”);
}
@Override
public void signOut()
{
System.out.println(“DesktopGoogleServies: signOut()”);
}
@Override
public void rateGame()
{
System.out.println(“DesktopGoogleServices: rateGame()”);
}
@Override
public void submitScore(long score)
{
System.out.println(“DesktopGoogleServies: submitScore(” + score + “)”);
}
@Override
public void showScores()
{
System.out.println(“DesktopGoogleServies: showScores()”);
}
@Override
public boolean isSignedIn()
{
System.out.println(“DesktopGoogleServies: isSignedIn()”);
return false;
}
}[/cc]
So what is this class’s purpose? Well, since you can’t run the Google Services on anything other than an Android device, this will be the class the game uses when it’s running on the desktop. It’s really doesn’t do anything other than fill the space where the real Google Service calls would be.
Step 6 – Properly set up your Android application
Okay, now we’re getting into the real stuff. To begin, we’re going to start setting up MainActivity.java in our Android project.
- Open up MainActivity.java and have it implement IGoogleServices (have it keep extending AndroidApplication like it already should be – this is a main part where this tutorial is diverting from other tutorials, since you can’t just extend BaseGameActvity because you’re using LibGDX). Because it’s implementing the IGoogleServices interface, you’re going to need to add in all of the functions it needs to override, go ahead and do that and just leave them empty for now.
- Create a new GameHelper member and call it _gameHelper. In the onCreate() function, initialize it like so:
[cc lang=”java” escaped=”true”]private GameHelper _gameHelper;
@Override
public void onCreate(Bundle savedInstanceState)
{
super.onCreate(savedInstanceState);
// Create the GameHelper.
_gameHelper = new GameHelper(this, GameHelper.CLIENT_GAMES);
_gameHelper.enableDebugLog(false);
GameHelperListener gameHelperListener = new GameHelper.GameHelperListener()
{
@Override
public void onSignInSucceeded()
{
}
@Override
public void onSignInFailed()
{
}
};
_gameHelper.setup(gameHelperListener);
// The rest of your onCreate() code here…
}[/cc]
Next up, you need to notify the _gameHelper object of the state of the Android application. To do this, you need to inform it of onStart(), onStop(), and onActivityResult() function calls. It’s pretty simple, just add the following to MainActivity.java:
[cc lang=”java” escaped=”true”]@Override
protected void onStart()
{
super.onStart();
_gameHelper.onStart(this);
}
@Override
protected void onStop()
{
super.onStop();
_gameHelper.onStop();
}
@Override
protected void onActivityResult(int requestCode, int resultCode, Intent data)
{
super.onActivityResult(requestCode, resultCode, data);
_gameHelper.onActivityResult(requestCode, resultCode, data);
}[/cc]
If we had just extended BaseGameActivity, all of the above would essentially be taken care of for us. But like I said, we can’t do that, so we have to do it manually. In the end it really isn’t a big deal, now is it?
Alright, now comes the next step. We need to pass the MainActivity class to our main game class – this is how we’re going to call all of those functions we defined in the IGoogleServices interface.
- In MainActivity.java, find the line of code where you initialize your main game class, mine looks like this:
[cc lang=”java” escaped=”true”]initialize(new Game(), cfg);[/cc] - Change it to the following:
[cc lang=”java” escaped=”true”]initialize(new Game(this), cfg);[/cc] - Go into your desktop project and into Main.java, find the line where you initialize your main game class, mine looks like this:
[cc lang=”java” escaped=”true”]new LwjglApplication(new Game(), cfg);[/cc] - Change it to the following:
[cc lang=”java” escaped=”true”]new LwjglApplication(new Game(new DesktopGoogleServices()), cfg);[/cc] - Now both our desktop and Android projects are passing an instance of an IGoogleServices object to our main game class. Let’s catch this object and store it as a static member so we can reference it all throughout our game files with no hassle. In your main game class have something like the following, where you catch and store the IGoogleServices object:
[cc lang=”java” escaped=”true”]public static IGoogleServices googleServices;
public Game(IGoogleServices googleServices)
{
super();
Game.googleServices = googleServices;
}[/cc]
We’re done setting things up, now lets actually call some API functions.
Step 7 – Call all kinds of functions, all kinds
The following part of the tutorial actually fills in all of those blank interface functions in MainActivity.java. Now, if you want to implement leaderboards, you’re going to need to create a leaderboard on your Google Play Developer Console. Once it’s created, take the leaderboard ID and go into that ids.xml file we created and add it there:
[cc lang=”xml” escaped=”true”]<string name=”leaderboard_id”>YOUR LEADERBOARD ID HERE</string>[/cc]
This is of course only if you want leaderboards. Once this is done, it’s time to continue forward.
Alright, let’s fill in those blank functions in MainActivity.java. Here’s the code for that (again, really sorry about the lack of tabbing, blame WordPress!):
[cc lang=”java” escaped=”true”]@Override
public void signIn()
{
try
{
runOnUiThread(new Runnable()
{
//@Override
public void run()
{
_gameHelper.beginUserInitiatedSignIn();
}
});
}
catch (Exception e)
{
Gdx.app.log(“MainActivity”, “Log in failed: ” + e.getMessage() + “.”);
}
}
@Override
public void signOut()
{
try
{
runOnUiThread(new Runnable()
{
//@Override
public void run()
{
_gameHelper.signOut();
}
});
}
catch (Exception e)
{
Gdx.app.log(“MainActivity”, “Log out failed: ” + e.getMessage() + “.”);
}
}
@Override
public void rateGame()
{
// Replace the end of the URL with the package of your game
String str =”https://play.google.com/store/apps/details?id=org.fortheloss.plunderperil”;
startActivity(new Intent(Intent.ACTION_VIEW, Uri.parse(str)));
}
@Override
public void submitScore(long score)
{
if (isSignedIn() == true)
{
Games.Leaderboards.submitScore(_gameHelper.getApiClient(), getString(R.string.leaderboard_id), score);
startActivityForResult(Games.Leaderboards.getLeaderboardIntent(_gameHelper.getApiClient(), getString(R.string.leaderboard_id)), REQUEST_CODE_UNUSED);
}
else
{
// Maybe sign in here then redirect to submitting score?
}
}
@Override
public void showScores()
{
if (isSignedIn() == true)
startActivityForResult(Games.Leaderboards.getLeaderboardIntent(_gameHelper.getApiClient(), getString(R.string.leaderboard_id)), REQUEST_CODE_UNUSED);
else
{
// Maybe sign in here then redirect to showing scores?
}
}
@Override
public boolean isSignedIn()
{
return _gameHelper.isSignedIn();
}[/cc]
And that’s pretty much the end of that!
Oh, and the REQUEST_CODE_UNUSED mentioned in the above code is just an integer, the value doesn’t really matter since it’s unused. At the top of MainActivity.java I have a member:
[cc lang=”java” escaped=”true”]private final static int REQUEST_CODE_UNUSED = 9002;[/cc]
Your game will now start – if it’s on the Desktop it gets passed a new DesktopGoogleServices object (which really does nothing) and if it’s on an Android device it gets passed the MainActivity object. Either way, both of these objects are IGoogleServices interfaces and thus can be used to call the different functions, signIn(), submitScore(), showScores(), etc from your main game source code.
Feel free to begin adding/removing your own functions to IGoogleServices. Add things like achievements, multiplayer actions, more leaderboards, etc…
Signing your application
But wait! You need to sign your Android application and give the SHA1 fingerprint to Google so it can link your API calls to your game (on your Google Play Developer Console, go to Game Services > select your game > Linked Apps > link an Android app and fill in all of the information > here you’ll be prompted for your SHA1 fingerprint).
A big issue I had was that I never found a clear, concise answer as to what exactly signing your application meant and how to do it. Oh, and how to get your signing certificate fingerprint, otherwise known as the SHA1, which is required to use Google Services leaderboards. If you’re in that boat, hopefully I can help clear things up for you.
Okay, so in simple terms, what does “signing your application” mean? When your application is compiled, it is signed with a keystore file. Every time you run/debug your Android application from Eclipse, Eclipse uses the same debug keystore to sign your application, it is located in the /.android/ folder on your C: (or in my case, my D:).
This is only used for debugging, though. When you release your application you need to use your own keystore (more on that in a minute). In the meantime, however, the debug keystore is still a keystore, and as a result you can still retrieve the SHA1 fingerprint from it and use that in your Google Play Developer Console (though when you eventually export a release build of the app with your own keystore, you’re going to need to use that SHA1 fingerprint from that keystore instead.)
To get the SHA1 fingerprint from the debug keystore in Eclipse, go to Window > Preferences > Android > Build. There you’ll see the location of your debug keystore as well as the MD5 and SHA1 fingerprints.
Creating your own keystore
Okay, so you want to export a release-version of your Android application. Here’s how to do it.
- Right-click your Android project in the Package Explorer window. From here, select Android Tools > Export Signed Application package.
- In this window, your Android project should already be selected, so click Next.
- Now, if you already have a keystore created, browse to its location and fill in the password for it. If you don’t have a keystore created, select Create new keystore and fill in a location to save it to as well as a secure password.
- On this next window, fill out an alias (use your first name), another password, the longevity of the certificate in years (choose a high number), and at least one of the other fields.
- That’s it, the keystore was created. The window you are prompted with now is the window you’ll always see when you export a signed application – just choose where you want the APK to be saved and click Finish.

You can use that keystore you just created with all of your apps. It is used to identify yourself as the legitimate app creator, so be careful with it. Without that keystore, you won’t be able to sign an application the same way and as a result, updating your app once released on Google Play will be a bit of a hassle.
Things I learned / Having problems?
- In the tutorials I was reading, I don’t ever recall seeing the requirement to put this line in the Android Manifest:
[cc lang=”xml” escaped=”true”]<meta-data android:name=”com.google.android.gms.version” android:value=”@integer/google_play_services_version” />[/cc]
However, it is required and led to a good headache until I figured it out. Don’t forget it! - To publish your app on Google Play using Google Services, you need to have at least 5 achievements in your game. I wasn’t planning on achievements and couldn’t believe this was a requirement. However, there’s a way around it. Simply create 5 blank achievements on the Google Play Developer Console but don’t actually implement anything about them in your game. And just like that, boom, you’re done.
- The first time I went to export a signed Android application, I was greeted with an error, something along the lines of:
Plunder Peril is not translated in af, am, ar, be, bg, … (and essentially every other language in the world)
This seemed a bit excessive, the solution is to turn this issue into a Warning, not an Error. To do this, go to Window > Preferences > Android > Lint Error Checking and find the MissingTranslation ID and set it to Warning.
- I didn’t like Google Services immediately prompting me to log in as soon as my app started. While you may want this functionality, it can be removed by simply adding the following in MainActivity.java:
[cc lang=”java” escaped=”true”]_gameHelper.setMaxAutoSignInAttempts(0);[/cc]
Right before this code:
[cc lang=”java” escaped=”true”]_gameHelper.setup(gameHelperListener);[/cc] - This is a bit of a weird one. When I first exported my Android application as a release build, I needed to add a new linked app with a new SHA1 fingerprint to my Google Play Developer Console. Even though I did this, and I made 100% sure that the SHA1 fingerprint was correct, my leaderboards wouldn’t work on my release build. I eventually tracked down the solution – you need to actually publish the game services (not the actual application). From the Google Play Developer Console, go to the Game Services tab, select your app, and in the drop-down bar on the right, select Publish Game.
The end
Wow, this is a long post. Hopefully I didn’t miss anything.
If you have any questions, please post them in the comments!